Camera Keyframes
5.1 expanded camera presets from single-waypoint snapshots into full keyframed sequences — a timeline of camera positions with per-segment easing, played back as a smooth animated camera move.
The legacy single-waypoint presets still work; nothing changes for them.
Preset shapes
Section titled “Preset shapes”There are two preset shapes now:
- Legacy waypoint — a single
{ x, y, scale }. Applies instantly when triggered (with the existing camera-smoothing easing). - Keyframed sequence — an array of
keyframes, each with{ time, x, y, scale, easing }. Plays back as a tween through the keyframes in time order.
Both shapes coexist in the same preset list per scene.
Editor
Section titled “Editor”Open the Director (toolbar button on the scene controls). Switch to the Presets tab.
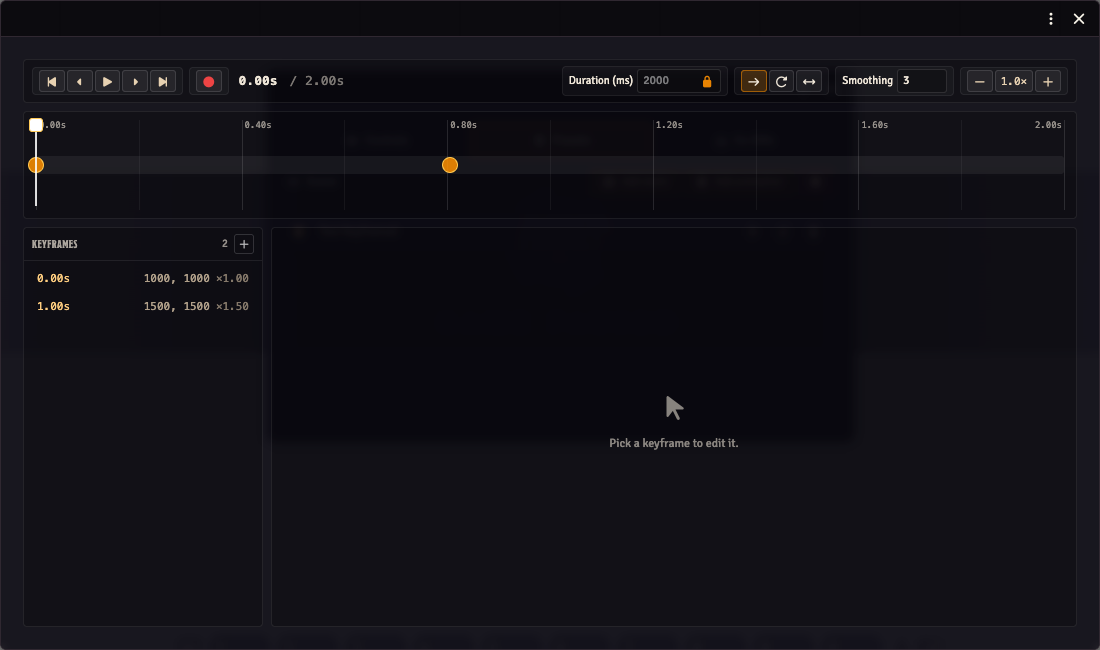
Each animation-preset row has a pen-to-square (edit) icon on the right. Clicking it opens the keyframe editor in a separate ApplicationV2 window (obs-utils-animation-preset, 880×520).
Adding keyframes
Section titled “Adding keyframes”When the editor is expanded on a keyframed preset:
- The timeline strip across the top shows the duration scale and the keyframes as draggable dots.
- The playhead is a vertical line; click on the timeline to move it.
- + Add keyframe at playhead captures the current canvas viewport at the playhead’s time. Pan the canvas to where you want the camera to be at that point, then click the button.
Editing a keyframe
Section titled “Editing a keyframe”Click a marker to select it. The detail panel below the timeline shows:
- Time (ms) — drag the marker on the timeline or edit the input.
- X / Y / Scale — the camera position at this keyframe.
- Easing — the curve used to interpolate FROM the previous keyframe TO this one. Options: linear, easeIn/Out/InOut, power1/2/3 in/out/inOut, sine variants, back variants.
- Capture from viewport — replace this keyframe’s x/y/scale with whatever the current canvas viewport is.
- Delete keyframe — remove the selected keyframe. The first and last keyframes can’t be removed (they bookend the sequence).
Loop mode
Section titled “Loop mode”The loop dropdown at the top of the panel:
- None — plays once, stops at the last frame
- Restart — loops back to the first keyframe and replays
- Ping-pong — reverses direction each cycle
Playback controls
Section titled “Playback controls”- ▶ Play — runs the sequence, animating the canvas viewport along the timeline. The playhead follows.
- ⏹ Stop — halts playback and disposes the timeline.
Runtime
Section titled “Runtime”The sequence runtime uses GSAP (provided by Foundry’s global). Each segment between consecutive keyframes becomes a gsap.to call on a viewport proxy; the onUpdate callback feeds the interpolated position into the canvas via the existing camera-smoothing infrastructure.
Custom cubic-bezier easings are supported via a built-in cubic-bezier evaluator (no CustomEase plugin dependency).
Programmatic playback
Section titled “Programmatic playback”There are two API methods for preset playback, with different scopes:
playPreset(preset)(void) — the broadcast path. Claims active-GM control, switches both tracking-mode slots tocloneDM, pauses the DM’s outgoing viewport stream, and broadcasts the preset to every OBS client. Use this when you want the production camera to move.previewPreset(preset)(SequenceController) — local-only, no side effects. Animates the GM’s own canvas without touching tracking state or broadcasting anything. Returns a controller withpause(),resume(),scrub(ms), andstop(). Use this when auditioning a sequence in the editor.
const api = game.modules.get('obs-utils').api;
// Broadcast to OBS — no return valueapi.playPreset(preset);
// Preview locally — full controllerconst controller = api.previewPreset(preset);controller.pause();controller.scrub(1500);controller.resume();controller.stop();
For legacy single-waypoint presets, both methods short-circuit to the existing clampAndApplyExternal path; previewPreset returns a no-op controller in that case.
Keyboard shortcuts
Section titled “Keyboard shortcuts”These shortcuts apply inside the keyframe editor window (opened via the pen-to-square icon on an animation preset row).
Playback
Section titled “Playback”| Input | Action |
|---|---|
| Click ▶ Play | Play from the current playhead position. |
| Ctrl/Cmd+click ▶ Play | Play from the start of the sequence regardless of playhead position. |
Timeline navigation
Section titled “Timeline navigation”| Input | Action |
|---|---|
| Click on the timeline strip | Move the playhead to that position. |
| Ctrl/Cmd+drag on the timeline strip | Draw a time-range lasso. All keyframes whose time falls inside the range are selected when you release. |
| Click prev/next keyframe button | Jump to the immediately previous or next keyframe. |
| Ctrl/Cmd+click prev keyframe button | Jump to the very first keyframe. |
| Ctrl/Cmd+click next keyframe button | Jump to the very last keyframe. |
| Ctrl/Cmd+click a keyframe dot on the timeline | Select that keyframe and pull the playhead to its time — handy for “go here, then play”. |
| Ctrl/Cmd+click a stacked-keyframe badge | Cycle selection through the stacked keyframes (same as a plain click) and pull the playhead to the newly selected keyframe’s time. |
| Ctrl/Cmd+scroll wheel | Zoom the timeline in or out. |
Keyframe list (sidebar)
Section titled “Keyframe list (sidebar)”| Input | Action |
|---|---|
| Click a row | Select that keyframe (clears any existing multi-selection). |
| Ctrl/Cmd+click a row | Toggle that keyframe in or out of the multi-selection. |
Nudging selected keyframes
Section titled “Nudging selected keyframes”When one or more keyframes are selected, you can nudge them in time with the arrow keys. The step size depends on the modifier held:
| Keys | Step |
|---|---|
| ← / → | 1 ms |
| Ctrl/Cmd+← / → | 10 ms |
| Shift+← / → | 100 ms |
Deleting keyframes
Section titled “Deleting keyframes”| Keys | Action |
|---|---|
| Backspace | Delete the selected keyframe(s). |
Note: the Delete key is captured by Foundry’s canvas layer for deleting tokens; use Backspace inside this editor.