Control OBS from Foundry
OBS Remote lets Foundry events control OBS. For example, combat starting can switch to your encounter scene, or an event can show or hide a source.
Video walkthrough: Watch OBS Utils — OBS Remote Control on YouTube.
To put your Foundry game into OBS, start with Getting started. You don’t need WebSocket settings just to display the game or overlays.
1. Enable OBS’s WebSocket server
Section titled “1. Enable OBS’s WebSocket server”In OBS Studio, open Tools → WebSocket Server Settings, enable the server, and keep authentication enabled. Use the connection information there for the port and password. WebSocket support is built into OBS Studio 28 and later; you don’t need a separate plugin for those versions. OBS’s remote-control guide covers its server settings.
2. Enter the connection in Foundry
Section titled “2. Enter the connection in Foundry”Open Settings → Configure Settings → OBS Utils Premium → OBS Remote Settings → Open Menu, then choose Connection.
Leave the URL as localhost or 127.0.0.1 unless the connection doesn’t work. This is the usual setup when OBS and its Foundry browser source run on the same computer, even if Foundry itself is hosted elsewhere.
| Field | What to enter |
|---|---|
| URL | localhost or 127.0.0.1. This is the computer running OBS, not your Foundry game URL. Do not add https://, ws://, /game or /stream. |
| Port | 4455, unless you changed it in OBS’s WebSocket server settings. |
| Password | The WebSocket password from OBS. This is not your Foundry login password. |
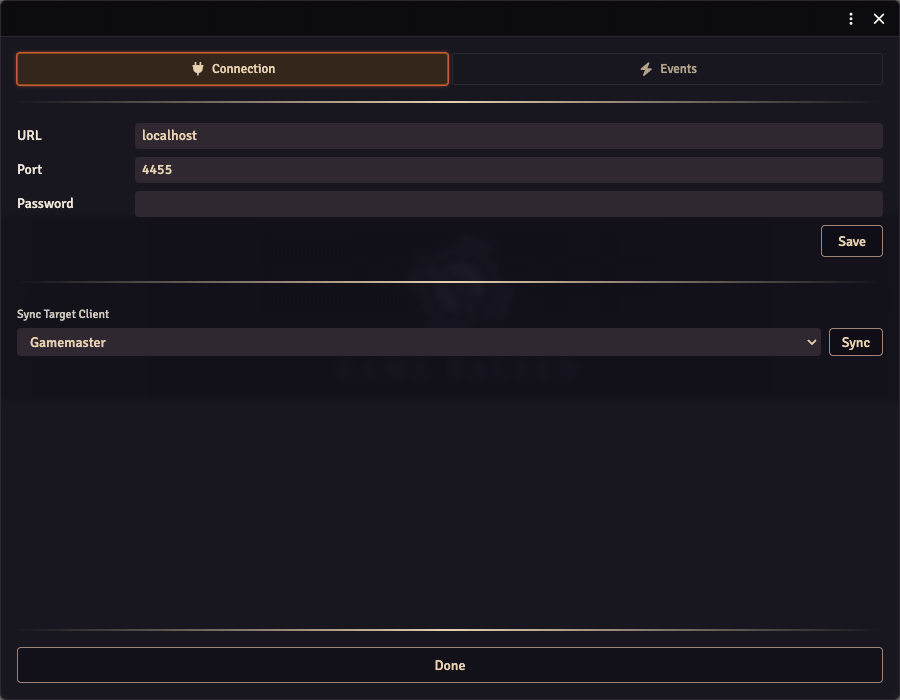
The screenshot shows the shared connection fields. In Premium 5.4.1, the connection options also appear above these fields.
In this Connection tab, turn on Enable OBS Websocket?. You do not need Allow OBS Websocket API Access? just to use OBS Remote; that option lets other modules call the connection.
Click Save after entering the connection details. If you entered them in your GM browser, select your online stream user under Sync Target Client, then click Sync. Select the user logged into the OBS browser source, not your GM account.
If your stream user isn’t listed, use Interact on the browser source to log that user in, then reopen the Connection tab.
3. Try one action
Section titled “3. Try one action”- In OBS Studio, choose a scene with a source you can safely show or hide. Note the exact scene and source names.
- In Foundry’s OBS Remote Settings → Events, add a Pause event.
- Add a Toggle Source action and enter those OBS scene and source names.
- Make that OBS scene visible in the preview. In your GM browser, unpause the Foundry game if needed, then pause it.
The source should change visibility in OBS. This checks an action that needs WebSocket access. Simple scene switching can also use OBS’s browser-source API, so a scene switch alone doesn’t confirm the WebSocket connection.
Remove the test event when you’re finished. You can then add the events and actions you want for your stream. Actions run in the order you put them in the event.
If it doesn’t connect
Section titled “If it doesn’t connect”- Check OBS is running and its WebSocket server is enabled.
- If
localhostfails, try127.0.0.1before looking for another IP address. - Recheck the port and WebSocket password, then Save and Sync again. Refresh the OBS browser source after changing connection details.
- Check Enable OBS Websocket? is enabled and the source is logged in as your stream user.
- Check scene and source names match OBS exactly.
Only change localhost if OBS actually runs on a different computer from the client making the connection. In that case, enter the address of the OBS computer, not the Foundry hosting provider. Firewall or network configuration may also need attention; keep authentication enabled rather than removing the password to try to fix it.